code前端网
new Vue({
    router,
    render: h => h(App)
}).$mount('#app')
问题:创建Vue实例时,路由器扮演什么角色?
- 将为示例添加两个属性
vue$route交通规则$router路线项目
01 活动进程
{
    path: '/detail/:id',
    name: 'Detail',
    // 开启 props,会把 URL 中的参数传递给组件
    // 在组件中通过 props 来接收 URL 参数
    props: true,
    // route level code-splitting
    // this generates a separate chunk (about.[hash].js) for this route
    // which is lazy-loaded when the route is visited.
    component: () => import(/* webpackChunkName: "detail" */ '../views/Detail.vue')
}
- 如何在元素 中获取此id
// 方式1 通过当前路由规则,获取数据
$route.params.id

// 方式2 路由规则中开启 props 传参
export default {
    props: ['id']
}
02 嵌套路径
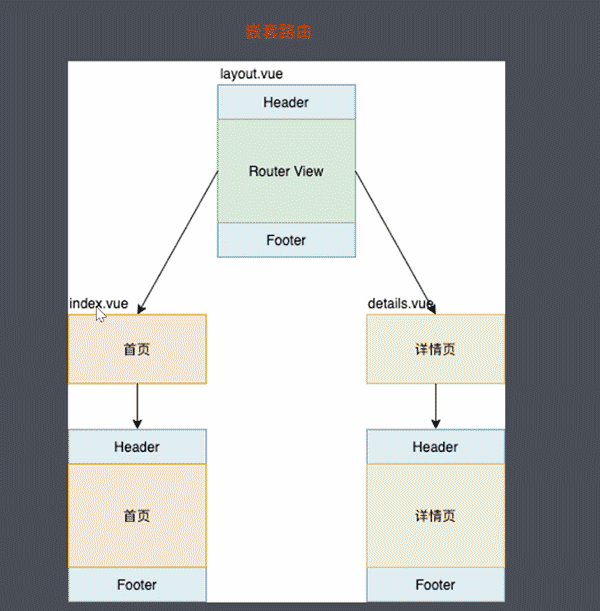

// 嵌套路由
  {
    path: '/',
    component: Layout,
    children: [
      {
        name: 'index',
        path: '',
        component: Index
      },
      {
        name: 'detail',
        path: 'detail/:id',
        props: true,
        component: () => import('@/views/Detail.vue')
      }
    ]
  }
03 纲领性研究
router.vuejs.org/en/guide/es…
// 字符串
router.push('home')

// 对象
router.push({ path: 'home' })

// 命名的路由
router.push({ name: 'user', params: { userId: '123' }})

// 带查询参数,变成 /register?plan=private
router.push({ path: 'register', query: { plan: 'private' }})
Hash 和 History 图案
的区别
router.vuejs.org/en/guide/es…
1。表达方式的差异
Hash图案 – 编号为#- music.163.com/#/playlist?…
History模式 – 需要与服务器配合使用- music.163.com/playlist/31…
2。基本区别
-
模式
Hash基于锚点,动作onhashchange- history.pushState() – 仅在 IE10 之后支持
- history.replaceState()
基于 HTML5 的 History API
pushState方法和push方法的区别在于,当我们调用push方法时,路径发生变化,向服务器发送请求;调用pushState不会发送请求,但会改变浏览器地址栏中的地址。并将这个地址记录在故事中
3。型号用途 History
const router = new VueRouter({
    mode: 'history',
    routes: []
})
History需要服务器支持- 因为单页面应用中,服务器不存在
http://www.testurl.com/login这样的地址会返回,页面会找不到 - 所以服务器应该返回除静态资源之外的单页应用
index.html
History 方法 Node.js 配置服务器
const path = require('path')
// 导入处理 history 模式的模块
const history = require('connect-history-api-fallback')
// 导入 express
const express = require('express')

const app = express()
// 注册处理 history 模式的中间件
app.use(history())
// 处理静态资源的中间件,网站根目录 ../web
app.use(express.static(path.join(__dirname, '../web')))

// 开启服务器,端口是 3000
app.listen(3000, () => {
  console.log('服务器开启,端口:3000')
})
History 方法 nginx 配置服务器
nginx服务器配置(Windows)- 官网下载压缩包
nginx - 解压到c盘根文件夹,c:\nginx-1.18.0文件夹
- 打开命令行并导航到文件夹 c:\nginx-1.18.0
- 官网下载压缩包
# 启动
start nginx
# 重启
nginx -s reload
# 停止
nginx -s stop

# 处理 history 模式
location / {
  try_files $uri $uri/ /index.html;
}
# try_files 意思是 试着去访问一下这个文件
# $uri 当前请求的路径
Vue Router 应用规则
Vue先验知识
- 插件
- 混合
- Vue.observable()
- 插槽
- 渲染功能
- 时间和完整的Vue
1。 Hash模式
URLin#以下内容用作路径地址- 听
hashchange行动 - 找到对应元素,根据当前路径地址重复
2。 History模式
- 使用方法
history.pushState()更改地址栏
- 聆听活动
popstate- 拨打
pushstate和replacestate时,不会发生此事件 - 来回继续
- 拨打
- 找到对应元素,根据当前路径地址重复
3。模拟应用

应用链接路由器
Vue 构建
- 运行时版本:不支持模板,需要包时必须预先配置
- 完整版:包含runtime和composer,比运行版大约大10KB。程序运行时,模板转换为render 函数
vue-cli 创建的默认版本是运行时版本
[Vue 警告]:您仅使用 Vue 功能,而没有使用 Composer。可以预先构建要渲染的模型,也可以使用内置编译器。
如何解决这个问题?
- 使用完整版
Vue- cli.vuejs.org/zh/config/#…
- 使用
render
initComponents (Vue) {
    // 创建 router-link组件
    Vue.component('router-link', {
      props: {
        to: String
      },
      render (h) {
        return h('a', {
          attrs: {
            href: this.to
          }
        }, [this.$slots.default])
      }
    })
  }
应用路由器视图
initComponents (Vue) {
    // 创建 router-link组件
    Vue.component('router-link', {
      props: {
        to: String
      },
      render (h) {
        return h('a', {
          attrs: {
            href: this.to
          },
          on: {
            click: this.clickHandler
          }
        }, [this.$slots.default])
      },
      methods: {
        clickHandler (e) {
          history.pushState({}, '', this.to)
          this.$router.data.current = this.to
          e.preventDefault()
        }
      }
    })
    const self = this
    Vue.component('router-view', {
      render (h) {
        const component = self.routerMap[self.data.current]
        return h(component)
      }
    })
  }
实现initEvent
initEvent () {
    window.addEventListener('popstate', () => {
      this.data.current = window.location.pathname
    })
  }
完整代码如下
let _Vue = null
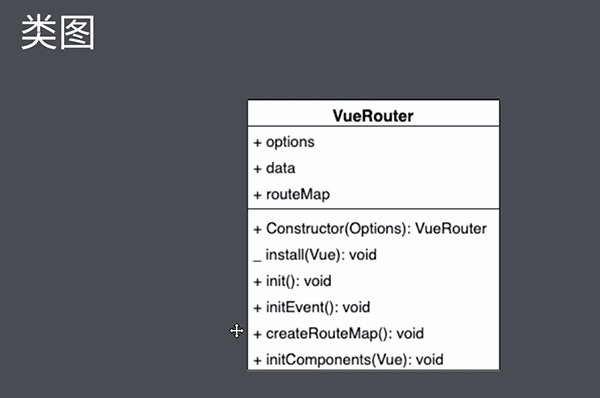
class VueRouter {
static install (Vue) {
// 1. 判断当前插件是否已经被安装
if (VueRouter.install.installed) {
return
}
VueRouter.install.installed = true
// 2. 把Vue构造函数记录到全局变量
_Vue = Vue
// 3. 把创建Vue实例时候传入的router对象注入到Vue实例上
// 混入
_Vue.mixin({
beforeCreate () {
if (this.$options.router) {
_Vue.prototype.$router = this.$options.router
this.$options.router.init()
}
}
})
}
constructor (options) {
this.options = options
this.routerMap = {}
this.data = _Vue.observable({
current: '/'
})
}
init () {
this.createRouteMap()
this.initComponents(_Vue)
this.initEvent()
}
createRouteMap () {
// 遍历所有的路由规则,把路由规则解析成键值对的形式,存储到routeMap中
this.options.routes.forEach(route => {
this.routerMap[route.path] = route.component
})
}
initComponents (Vue) {
// 创建 router-link组件
Vue.component('router-link', {
props: {
to: String
},
render (h) {
return h('a', {
attrs: {
href: this.to
},
on: {
click: this.clickHandler
}
}, [this.$slots.default])
},
methods: {
clickHandler (e) {
history.pushState({}, '', this.to)
this.$router.data.current = this.to
e.preventDefault()
}
}
})
const self = this
Vue.component('router-view', {
render (h) {
const component = self.routerMap[self.data.current]
return h(component)
}
})
}
initEvent () {
window.addEventListener('popstate', () => {
this.data.current = window.location.pathname
})
}
}
export default VueRouter