code前端网
前言
有一种场景是给动态创建组件添加指令,当时可难坏了,因为 createComponent API 不支持绑定指令,所以我当时猜想是否可以在 @Component 注入或 @HostBindingDirective 绑定实现呢?找了很久,最终发现官方支持了这种,选择的是前者,Feature Issue 如下:
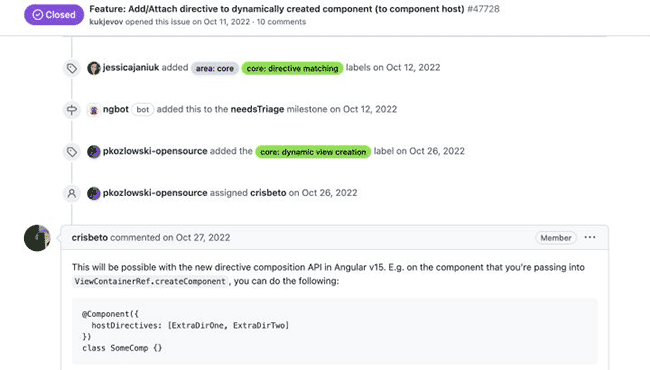

具体详情: github.com/angular/ang…
简介
hostDirectives 是以依赖注入( @Component 装饰器)的方式给宿主绑定指令,该特性于 Angular 15 支持。
基本使用:
    @Component({
      selector: 'app-demo',
      template: '<div></div>',
      hostDirectives: [CdkDrag]
    })
    export class DemoComponent {}
等价于
<app-demo cdkDrag></app-demo>
有些类似 host 属性(或 @HostBinding('class') className = 'active' )和 <div class='active'></div> 的关系。
需要注意的点
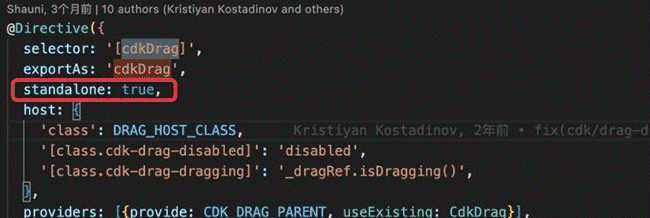
- Angular 会在编译时静态应用宿主指令。不能在运行时动态添加指令。
- hostDirectives 中使用的指令必须是 standalone: true 。
- Angular 会忽略 hostDirectives 属性中所应用的那些指令的 selector 。
还有个小区别是,hostDirectives 添加的指令不会给 dom 元素加上属性,不过这并不影响效果。


指令支持输入(属性)与输出(事件)
- 创建一个指令
import { Directive, EventEmitter, Input, OnInit, Output, ViewContainerRef } from '@angular/core';
@Directive({
selector: '[one]',
exportAs: 'one',
standalone: true
})
export class DirectiveOne implements OnInit {
@Input() public name: string;
@Output() nameChange = new EventEmitter();
constructor(private viewContainer: ViewContainerRef) {}
ngOnInit(): void {
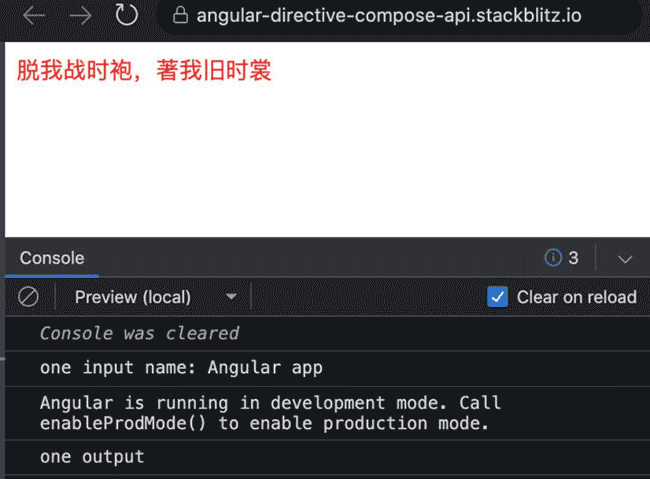
console.log('one input name: ' + this.name);
this.viewContainer.element.nativeElement.style = 'color: red;';
setTimeout(() => {
this.nameChange.emit('one name output');
}, 1000);
}
}
- 组件使用指令添加输入输出参数
    @Component({
      selector: 'app-demo',
      standalone: true,
      imports: [DirectiveOne],
      hostDirectives: [
        {
          directive: DirectiveOne,
          inputs: ['name'],
          outputs: ['nameChange']
        }
      ],
      template: `脱我战时袍,著我旧时裳`,
    })
    export class DemoComponent {}
- 使用组件绑定输入属性和事件返回
    import { Component, Input } from '@angular/core';
    import { CommonModule } from '@angular/common';
    import { bootstrapApplication } from '@angular/platform-browser';
    import { DemoComponent } from './demo.component';

    @Component({
      selector: 'my-app',
      imports: [CommonModule, DemoComponent],
      standalone: true,
      template: `
        <app-demo [name]="name" (nameChange)="change($event)"></app-demo>
      `,
    })
    export class App {
      @Input() name = 'Angular app';

      change(value) {
        console.log(value);
      }
    }
效果显示:
给输入/输出起别名
    {
          directive: DirectiveOne,
          inputs: ['name: Name'],
          outputs: ['nameChange: NameChange']
    }
<app-demo [Name]="name" (NameChange)="change($event)"></app-demo>
指令中引入另一个指令
方便理解,我把这种叫做指令嵌套或指令继承
- 指令 DirectiveTwo
    import { Directive } from '@angular/core';
    import { DirectiveOne } from './directive-one';

    @Directive({
      selector: '[two]',
      standalone: true,
      exportAs: 'two',
      hostDirectives: [DirectiveOne]
    })
    export class DirectiveTwo {}
- 组件使用指令
    import { Component, Input } from '@angular/core';
    import { DirectiveTwo } from './directive-two';

    @Component({
      selector: 'app-demo',
      standalone: true,
      imports: [DirectiveTwo],
      hostDirectives: [DirectiveTwo],
      template: `脱我战时袍,著我旧时裳`,
    })
    export class DemoComponent { }
指令嵌套的执行顺序
以上述为例,大体的执行顺序为: DirectiveOne -> DirectiveTwo 。
加上每个指令生命钩子后的顺序为: DirectiveOne constructor(初始化)-> DirectiveTwo constructor(初始化)-> DirectiveOne ngOnInit -> DirectiveTwo ngOnInit ...... 等等, 这个顺序意味着后续的指令可以修改前面指令对宿主元素的操作 。
示例如下:
- DirectiveOne
import { Directive, EventEmitter, Input, OnInit, Output, ViewContainerRef } from '@angular/core';

    @Directive({
      selector: '[one]',
      exportAs: 'one',
      standalone: true,
    })
    export class DirectiveOne implements OnInit {
      @Input() public name: string;
      @Output() nameChange = new EventEmitter();
      constructor(private viewContainer: ViewContainerRef) {
        console.log('one constructor');
      }
      ngOnInit(): void {
        console.log('one ngOnInit');
        // console.log('one input name: ' + this.name);
        this.viewContainer.element.nativeElement.style = 'color: red;';
        setTimeout(() => {
          this.nameChange.emit('one output');
        }, 1000);
      }
    }
- DirectiveTwo
import { Directive, EventEmitter, Input, OnInit, Output, ViewContainerRef } from '@angular/core';
    import { DirectiveOne } from './directive-one';

    @Directive({
      selector: '[two]',
      standalone: true,
      exportAs: 'two',
      hostDirectives: [
        {
          directive: DirectiveOne,
          inputs: ['name'],
          outputs: ['nameChange']
        }
      ]
    })
    export class DirectiveTwo implements OnInit {
      @Input() public name = '';
      @Output() nameChange = new EventEmitter();
      constructor(private viewContainer: ViewContainerRef) {
        console.log('two constructor');
      }
      ngOnInit(): void {
        console.log('two ngOnInit');
        // 覆盖宿主元素
        this.viewContainer.element.nativeElement.innerHTML += ';<span>当窗理云鬓,对镜帖花黄</span>。';
        this.viewContainer.element.nativeElement.style = 'color: red; background-color: yellow;';
      }
    }
- 组件使用指令
    import { Component } from '@angular/core';
    import { DirectiveTwo } from './directive-two';

    @Component({
      selector: 'app-demo',
      standalone: true,
      imports: [DirectiveTwo],
      hostDirectives: [
        {
          directive: DirectiveTwo,
          inputs: ['name'],
          outputs: ['nameChange']
        }
      ]
      template: `脱我战时袍,著我旧时裳`
    })
    export class DemoComponent {
      constructor() {
        console.log('demo constructor');
      }

      ngOnInit() {
        console.log('demo ngOnInit');
      }
    }
- 使用组件
    @Component({
      selector: 'my-app',
      imports: [CommonModule, DemoComponent],
      standalone: true,
      template: `
        <app-demo [name]="name" (nameChange)="change($event)"></app-demo>
      `,
    })
    export class App {
      @Input() name = 'Angular app';
    }
效果展示:
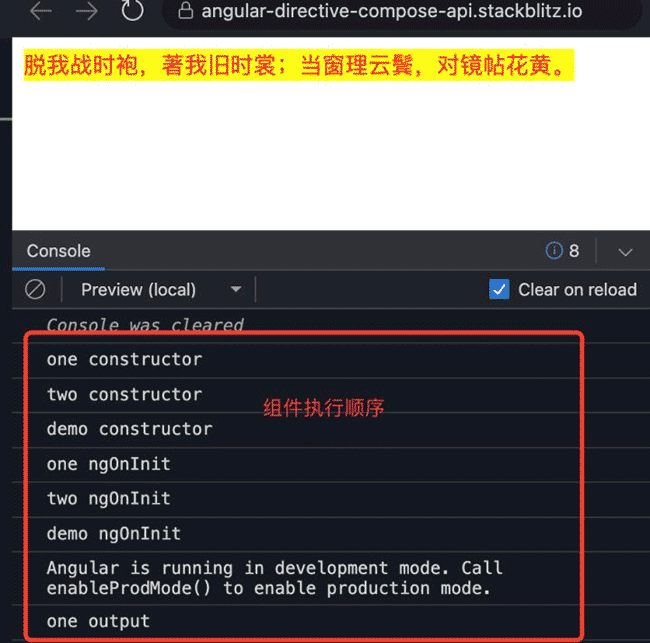
最终的效果可以发现 DirectiveTwo 在 DirectiveOne 的基础上修改了宿主元素。
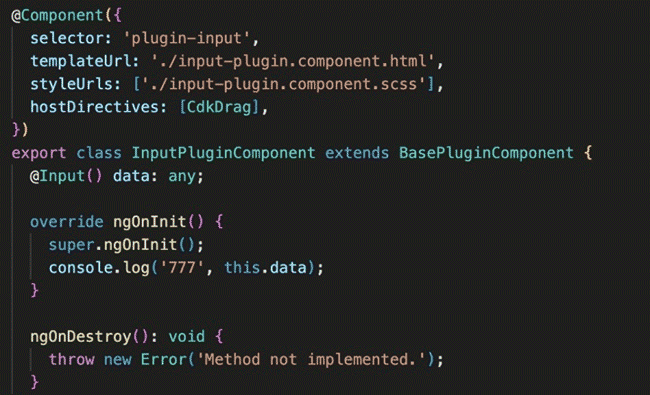
向动态创建的组件添加指令
场景:使用官方 cdk 的拖拽组件实现将左侧组件拖拽至可添加区域(中间部分),并且中间的元素可拖拽排序,所以中间部分也必须是一个 cdkDragList,复制出的组件必须包含指令 cdkDrag。
- 动态创建组件:
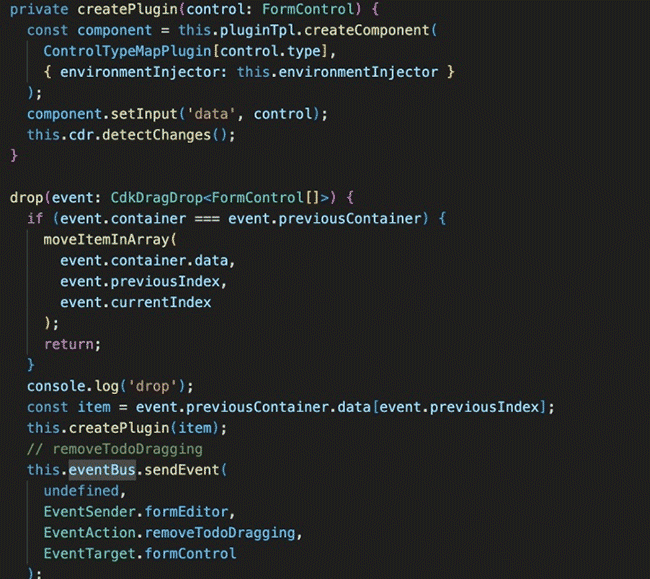

2. 给组件添加 cdkDrag 指令
dom 元素

完整代码
angular-directive-compose-api – StackBlitz
参考
- Angular directive-composition-api
- Angular @Directive#hostdirectives
原文链接:https://juejin.cn/post/7264736332145180729 作者:阿阿阿阿阿阿杰